There are three types of texts that are shown on your website:
- Pages
- Posts (Blog articles/news items)
- Products
Originally, WordPress was created for people to easily create a blog website.
On the front page, visitors could see the latest news in a few lines, and there is a link ‘more…’ to read the rest of the blog post. After clicking, there was a special page whith the entire blog Post. This is a WordPress Post. The front page was dynamic: every time a new blog post was published, this would appear on top of the front page. The front page could change every day or even every hour or even more frequently.
For most blogs, there was also a static page, that would not change frequently: the ‘About’ page. This was a short description of the purpose of the blog and some background information about the author. This page is a WordPress Page. It was always possible to create more than just this one static page.
For your website, there are many ‘static’ pages, and only one dynamic page with blog posts/news items, which is not the front page.
Your dynamic Blog page is www.judge-smith.com/wp/news.
For your website, there are also pages about every product you sell (CD’s, DVD’s, books), with information about the price and shipping costs etc.. These special pages are WordPress WooCommerce Products.
There is also a horizontal WordPress Menu on your website, right below the bubblegum logo and your photo. Not all pages are linked in the menu.
WordPress Dashboard in its own tab
If you want to view, edit, delete or create Posts/Pages/Products, you go to the dashboard www.judge-smith.com/wp/wp-admin and click Posts/Pages/Products in the left menu. You’ll see a list with all the Posts/Pages/Products on your website, even the ones that are not published (yet) or in the website menu (yet). It is very convenient to keep the website open in one tab of your webbrowser, and the dashboard in a different tab. You can now switch between the tabs, and see the effect of your edits by refreshing the website.
Deleting a Post/Page/Product
Point to an existing Post/Page/Product and click Bin to delete it.
Editing or adding a Post/Page/Product
Simply click Add New or click on the title of the Post/Page/Product you want to edit.
You’ll see a wysiwyg-editor that is quite self evident. (You can edit the code by clicking the tab ‘Text’.)
Adding images and other media
If you want to add a media file such as an image, pdf-file or mp3 to your page, you click on the place where you want to insert the media file, and click add media. You can upload the media file and then select it.
- If it is a photo or other image, you now click insert into page. The images are resized by WordPress to fit, you can select if you just want to show a thumbnail or a slightly bigger image or full size.
- If it is another type of media file, you copy the URL address. Do not click insert.
- Now close this popup screen.
- In the page you were editing, select some text
- Now you click the paperclip, and paste the URL address you just copied.
Creating a link
- In the page you are editing, select some text
- Now you click the paperclip, and paste the URL address you want to link to.
A blank line
If you just press the Enter button on your keyboard, you start a new line in the editor, and see a blank line in between. After publishing, this blank line will be gone. If you want a blank line, press Ctrl-Enter.
If you want a new line to start, but with no blank line in between, press Shift-Enter.
Saving and publishing
- When a new page is ready, you click ‘Publish’ or ‘Update’ in the top right corner. The page is published now, but they are not available in the menu, so noone will see them yet.
- When you’re done editing an existing page, you click ‘Update’ in the top right corner. If the page was already in the menu, it will still be in the menu, if it wasn’t, it still won’t.
Menu
If you want to view, edit, delete or create links in the Menu, you go to the dashboard www.judge-smith.com/wp and click Appearance – Menus in the left menu. Here, you can add Posts/Pages/Products to the menu, and make them a sub-item of a main menu item if you want to. By clicking and holding the mouse button, you can drag a menu item to a different place in the menu. When you’re done, click Save Menu. Check your website (in the other tab) and refresh to see the effect of your edits.
Products
Your webshop www.judge-smith.com/wp/shop consists of all the products you sell in rows of as many items as will fit on the screen of the costumer. (You can change this layout in WooCommerce – Settings – Costumizer – Shop Loop.)
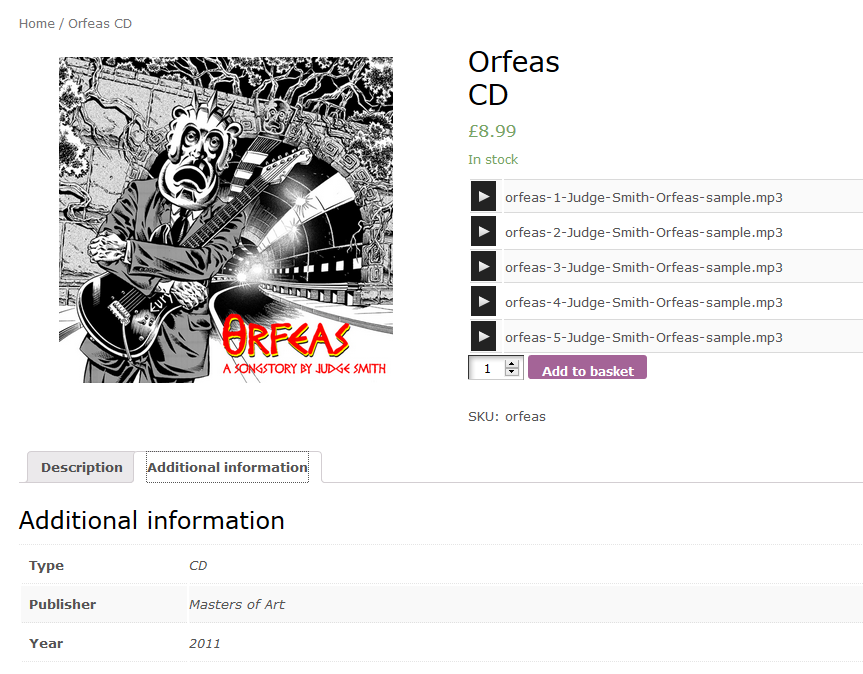
By clicking a product in your webshop, the visitor opens the page with all the information on that product/project, with links to subpages and with sample files etc. There, the visitor can order a product. The information at the top of the page and in the two tabs ‘Description’ and ‘Aditional information’ are the attributes you have to fill out for each product.
 |
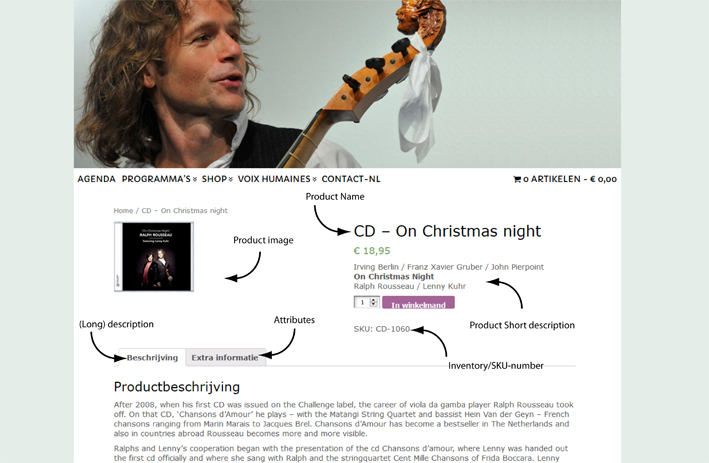
In the example below (from another website), you can see what each attribute is called in the dashboard, so you know where to change or add the information.
 |
In the dashboard, you can add a product.
First, you have to add the title of your product, in this way: Title <br> CD
For example: Orfeas <br> CD
This way, every item in the shop has a title, and shows the product type right away.
The page content will be show in the tab Description.
In the dashboard, you can find the other attributes below the general description of the product:
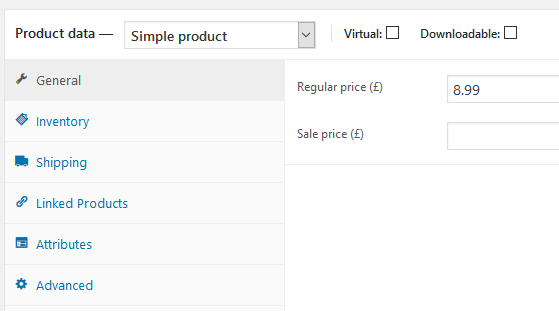 |
- General – Regular price: speaks for itself. Price including VAT (which you don’t use), so just the price.
- General – Sale price: this field can stay empty, until you want to have a sale for a short while.
- Inventory – SKU: this is the unique number for the product. We used a very simple short title, such as ‘orfeas’. You can’t use the same SKU for two products.
- Inventory – Manage stock: check the box.
- Inventory – Manage stock: fill out the number of items you have of this product. From now on, one will be substracted for each sold item.
- Inventory – Stock status: for example Democrazy is out of stock, so noone will be able to order it, but the page with all the information will still be available.
- Product Image: click to show the CD-cover on the product page. Select the image from the media library or upload a new image and select it. Now click set product image.
- Product short description: leave blank, we don’t use this. If you do put some text here, it will show up right next to the Product Image. You could include the members of the band and maybe a track list.
- Advanced: make sure the tick box for Enable reviews is empty.
- Shipping: choose the right shipping class.
Shipping
There are three categories which need to be determined in WooCommerce in order to calculate the cost:
- Zone – what is the address of the costumer? For your website we defined three zones: UK / Europe / Rest of the world
- Shipping Method – For your website we defined three methods: flat rate / signed for / free shipping
- Shipping Class – For your website we defined three classes: CD / double CD / DVD (we may have to add ‘book’ in the near future).
A table may help to make it more clear: a costumer must choose one of the empty boxes:
| shipping zone | CD | double CD | DVD |
| UK ‘flat rate’ | |||
| UK ‘signed for’ | |||
| UK ‘free shipping’ | |||
| Europe ‘flat rate’ | |||
| Europe ‘signed for’ | |||
| Rest of the world ‘flat rate’ | |||
| Rest of the world ‘signed for’ |
To change the standard prices we defined for each box, you go to WooCommerce – Settings – Shipping, and then Shipping Zones or Shipping Classes.
Adding samples to a shop item
- In the Control Panel, click Products, and open a Product page.
- Tick ‘downloadable’
- add all the sample files one by one
- Add file name
- Update
- Now untick ‘downloadable’
- Update again.
Featured Product on Home Page
If you want to, we can show a Featured Product on the Home Page. You can easily change the featured product yourself, each month or whenever you sell a new product.
In the list of all products (Dashboard – Products), there is an asterix for each product. One is selected. De-select that one, and select another one. It will take a few minutes, and then this product will show up on your Home Page.
Orders
If someone orders a product, they receive a confirmation email.
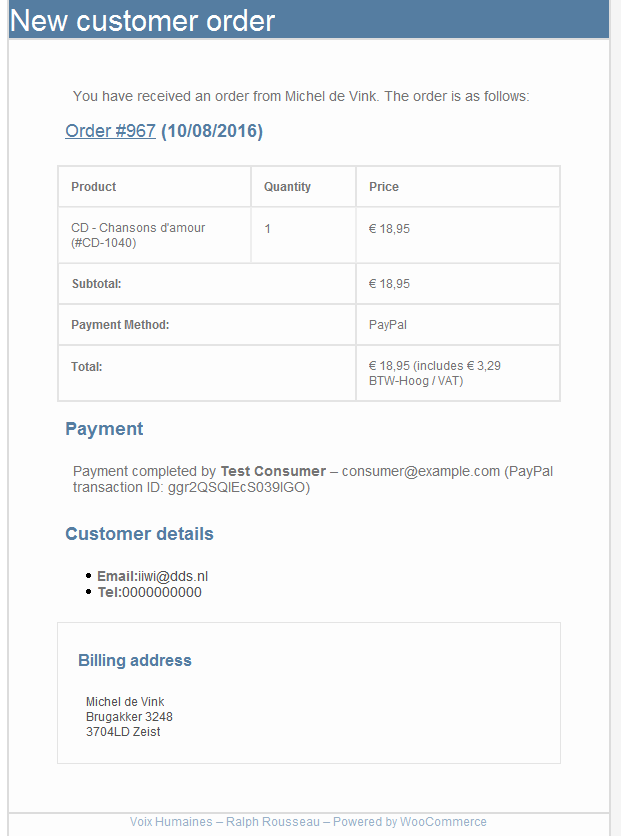
You yourself receive an email as well (this one is from another website I manage, but it looks the same):
Log in to the Dashboard, click WooCommerce – Orders.
Orders all have a status, which is shown by a coloured icon:
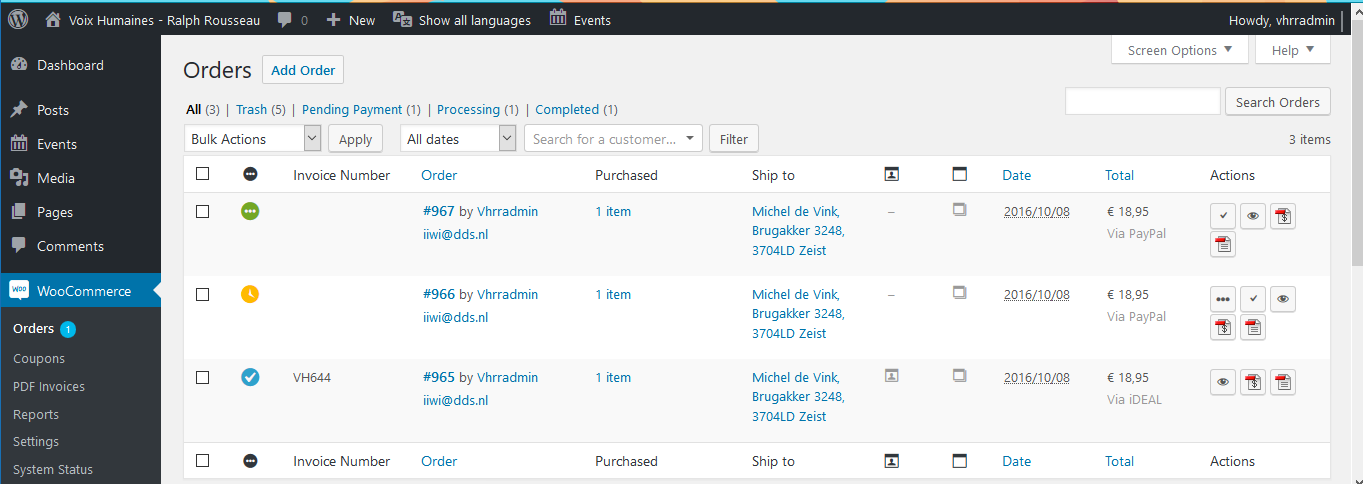
- Green icon with three dots – New orders that are already paid for. See below.
- Yellow icon with clock hands – New order that is not paid for yet. Maybe something went wrong, or the customer decided not to buy the product halfway through placing the order. If you want to, you can open the order, and email the customer, but you can also choose to ignore it. After a while, this order will be considered canceled, and the icon turns red.
- Red icon with a cross – Canceled order.
- Blue icon with a check mark – Completed orders (sent to the customer)
Green icon – new order:
Click on the eye-icon to see the details of the order, print the PDF Packing Slip, pack it, and send it out!
You can also view the invoice pdf here.
In the list with all the orders, you click on the checkbox on the right to confirm the order has been sent out. You can’t change the order anymore.
The customer will receive this email, with a pdf invoice as attacment: